In this post, I am going to walk you through the process of integrating a Next.js 13 (Next.js App Router) frontend with a custom backend Express.js server API. We will use Auth0 for authentication in this example, but the process would be similar for other auth providers.
Between Vercel's push towards serverless functions (No worries, I'm still a fanboy. For now...), and the seemingly widespread adoption of tRPC by much of the Typescript community, I have found the documentation on how to integrate your own backend API with the new Next.js app directory to be a bit sparse.
Now in many cases, if you are using Next.js with Typescript, it probably makes sense to use serverless functions and if you want full type-safety, then it would make sense to use tRPC too.
However, for my current project, there were a few reasons why I didn't want to use serverless or tRPC:
- I honestly just wanted more practice with writing REST APIs.
- I have yet to determine if this is unfounded, but I didn't really feel like working around cold starts as I expect my app's user base to start small and grow over time.
- If my application does gain traction, I didn't want to lock myself into using Typescript+Node.js just because I implemented the MVP using tRPC.
With that said, I do intend on learning those technologies in the future and advise that you also have some good reasons if you are going to build your Next.js application with a traditional API server.
For this post, I am going to assume that you have some basic knowledge of Next.js and Express.js and that you have an Auth0 account set up with a Next.js application. If not, here are some helpful resources to get you to that point:
- Express.js:
- Next.js + auth0:
Now, if you want to code along, I have put the starter code on my GitHub. You can download it here.
In this example, I will have the Express server stored in a server folder and the Next.js app in a client folder. I will run the apps in their own terminals, but the starter code is set up with concurrently if you prefer to run the apps from a single terminal.
Start Application
We will start by getting the base project running locally.
- Clone the starter code:
git clone https://github.com/benjamin-chavez/nextjs-express-auth0-template.git
cd nextjs-express-auth0-template
git checkout blog-post-starter-code- Set up the Environment Variables:
cp ./client/.env.local.example ./client/.env.local
cp ./server/.env.example ./server/.env
Be sure to update your Next.js environment variables with the values provided in your Auth0 application dashboard. Your updated file should look something like this:
# Secret key for Auth0 - To generate, run `openssl rand -hex 32` in the command line
AUTH0_SECRET='e2ebaf05e08f75b2eb3605ce28e6bf3ef0e68c54d9672ec87b4e69fae2f38460'

# The base URL for your application
AUTH0_BASE_URL='http://localhost:3000'

# Your Auth0 tenant domain
AUTH0_ISSUER_BASE_URL='https://dev-mqyygar8pnsvarul.us.auth0.com'

# Your Auth0 client ID
AUTH0_CLIENT_ID='oMv0Lmf1v2uTITiqQ67hhRJBL4XKdhO4'

# Your Auth0 client secret
AUTH0_CLIENT_SECRET='I_CFaneP_CyYQ-WBvXzwVlZKjsv4qL9YzY-hE8FE9HrsDNNtCJJnyp5s0vtt_yg1'- From the root directory, install the project dependencies:
pnpm i- Start the Next.js frontend application
cd client
pnpm dev- Open a second terminal and start the Express.js backend-server
cd server
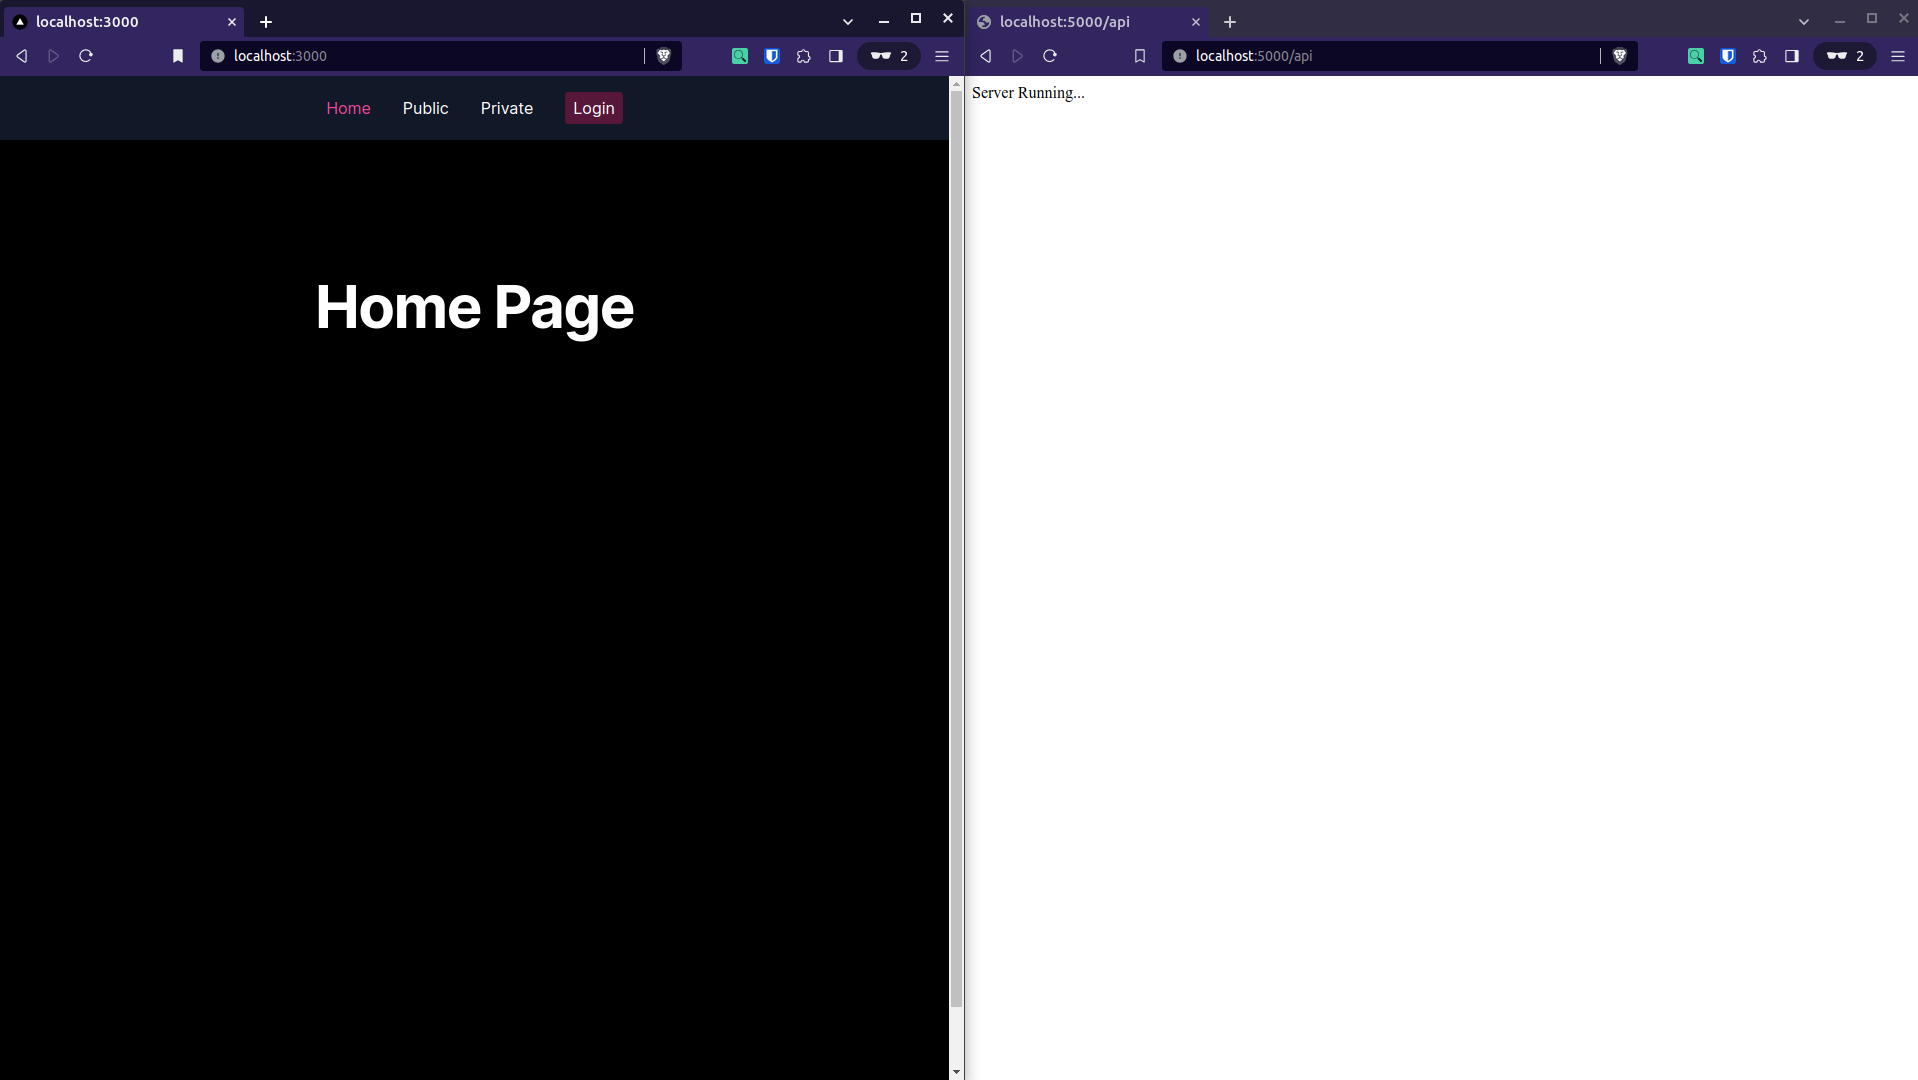
pnpm devNow, if you open your browser to http://localhost:3000 and http://localhost:5000/api, you will see the following:
Declare Rewrites
In Next.js a rewrite allows us to map any incoming navigation and/or client request paths to a specified destination path.
We are going to use rewrites to map all incoming API requests over to our Express server path.
Now, with both your frontend and backend running, go to http://localhost:3000/api in your browser. You will see a 404 page not found error.
- Stop your Next.js client-server and add the following code to your
client/next.config.jsfile.
/** @type {import('next').NextConfig} */
const nextConfig = {
  async rewrites() {
    return [
      {
        source: '/api/:path*',
        destination: 'http://localhost:5000/api/:path*',
      },
    ];
  },
};

module.exports = nextConfig;
Start up your Next.js client-server again and go back to http://localhost:3000/api in your browser.
The 404 should be gone, and you should now see Server Running... :
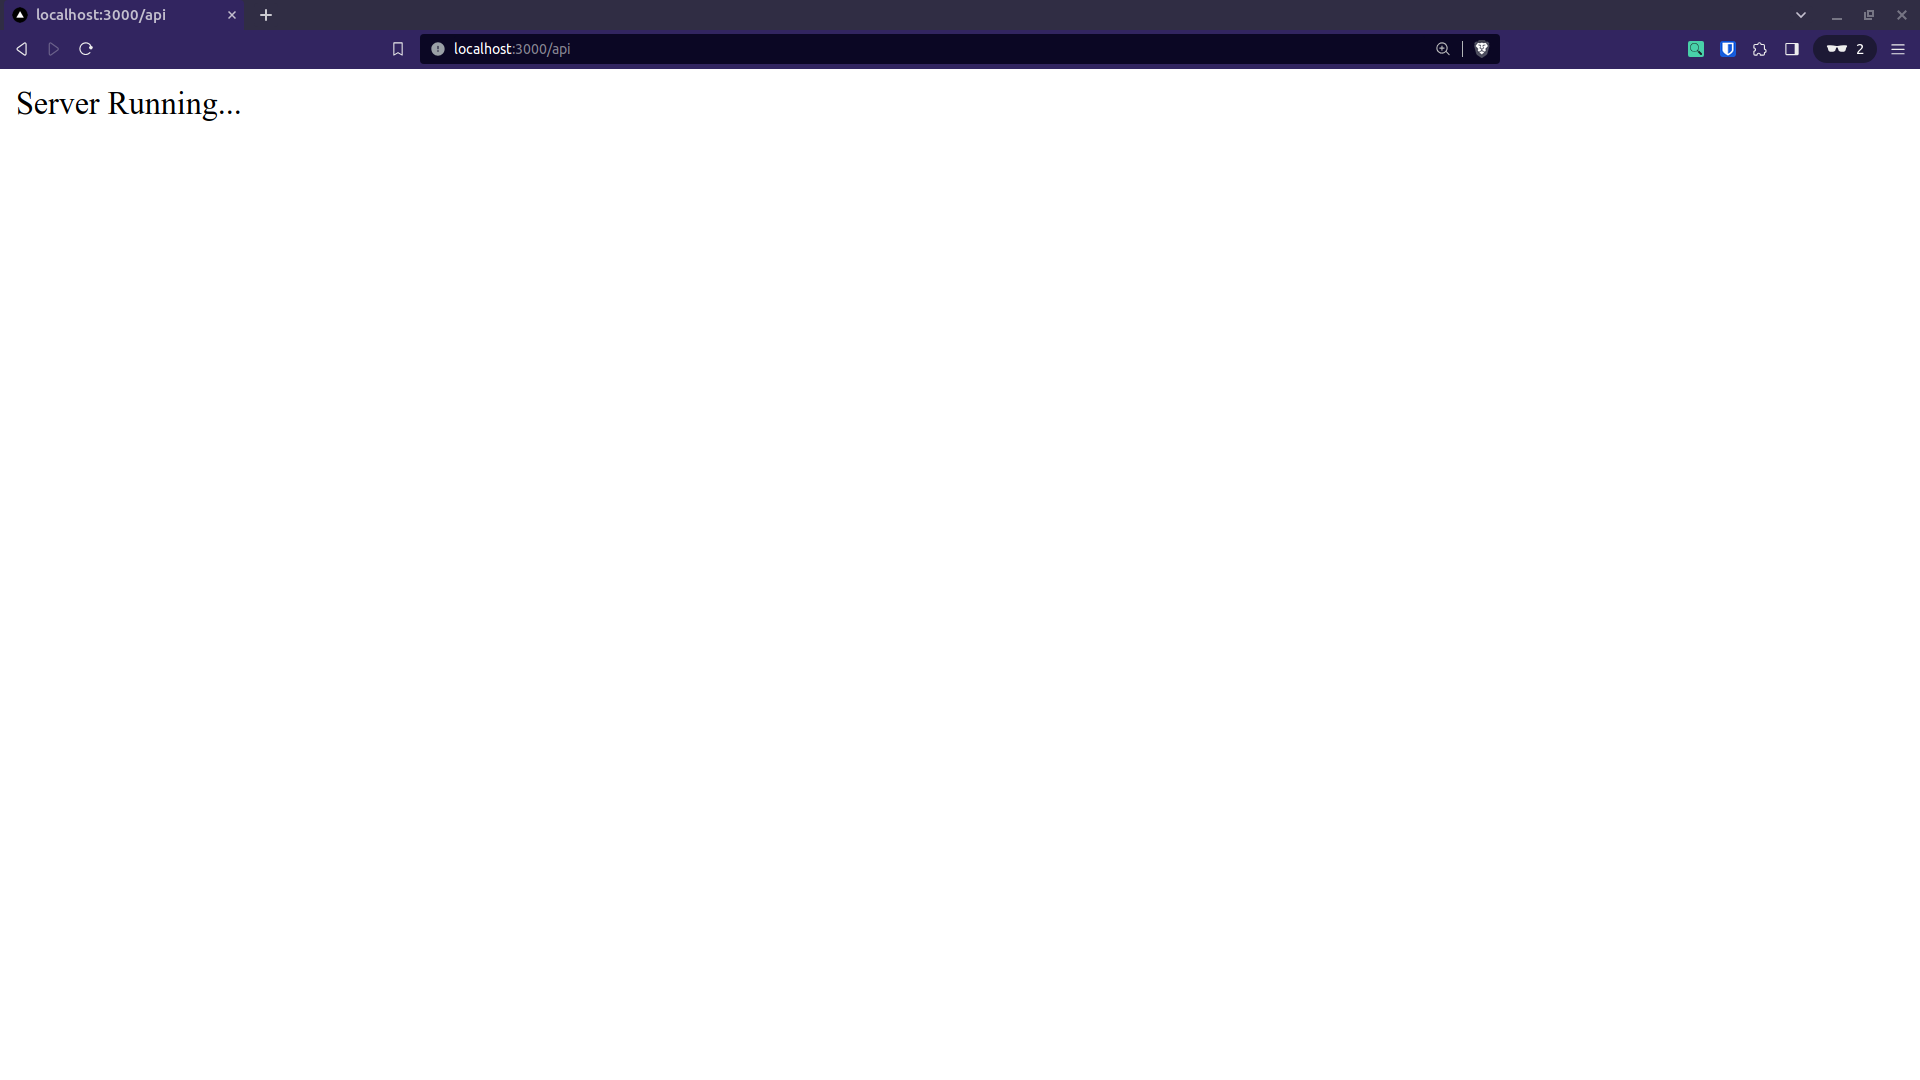
This "Server Running..." message is coming directly from your Express.js server because out request was mapped from the source path of http://localhost:3000/api over to the destination path of http://localhost:5000/api.
Before we continue, we need to add one more rewrite rule so that our client-side requests to the Auth0 API do not get rewritten. We need to do this because Auth0 requires us to use Next.js's API Router when implementing frontend auth inside of a Next.js application.
The new rewrite simply catches requests to the Auth0 API before they are rewritten to our server API and instead sends them to the requested source path unchanged.
/** @type {import('next').NextConfig} */
const nextConfig = {
  async rewrites() {
    return [
      {
        source: '/api/auth/:path',
        destination: '/api/auth/:path*',
      },
      {
        source: '/api/:path*',
        destination: 'http://localhost:5000/api/:path*',
      },
    ];
  },
};

module.exports = nextConfig;
Be sure to restart your client-side server after making any updates to the client/next.config.js file.
Add Next.js Middleware
Rather than requiring authentication in each of our private pages or components, we will implement our auth with Next.js Middleware, which will allow us to specify which routes we want to make private.
There are several benefits to this approach. The primary benefit is that it enables client-side handling of authentication and authorization in our Next.js application, as opposed to server-side handling in our Express.js server.
If we were to handle authentication on the server, we would need to send a request each time a user navigated to a new page. Consequently, our client-side application would also need to wait for our server to responds to each of those requests before allowing a user to actually view any content. You can imagine how this might become an unesary drag on performance.
Furthermore, the use of middleware allows us to keep our auth logic separate from our other application logic. This separation of concerns is a good design choice as the modularity reduces cognitive load, and if, later, we decide to change auth managers, we only have to update one file as opposed to having to update every private page/component in our application.
- Create a new
client/src/middleware.tsfile and add the following:
import { withMiddlewareAuthRequired } from '@auth0/nextjs-auth0/edge';

export default withMiddlewareAuthRequired();

export const config = {};
If you open your browser back to http://localhost:3000, you will automatically be redirected to the Auth0 login screen:
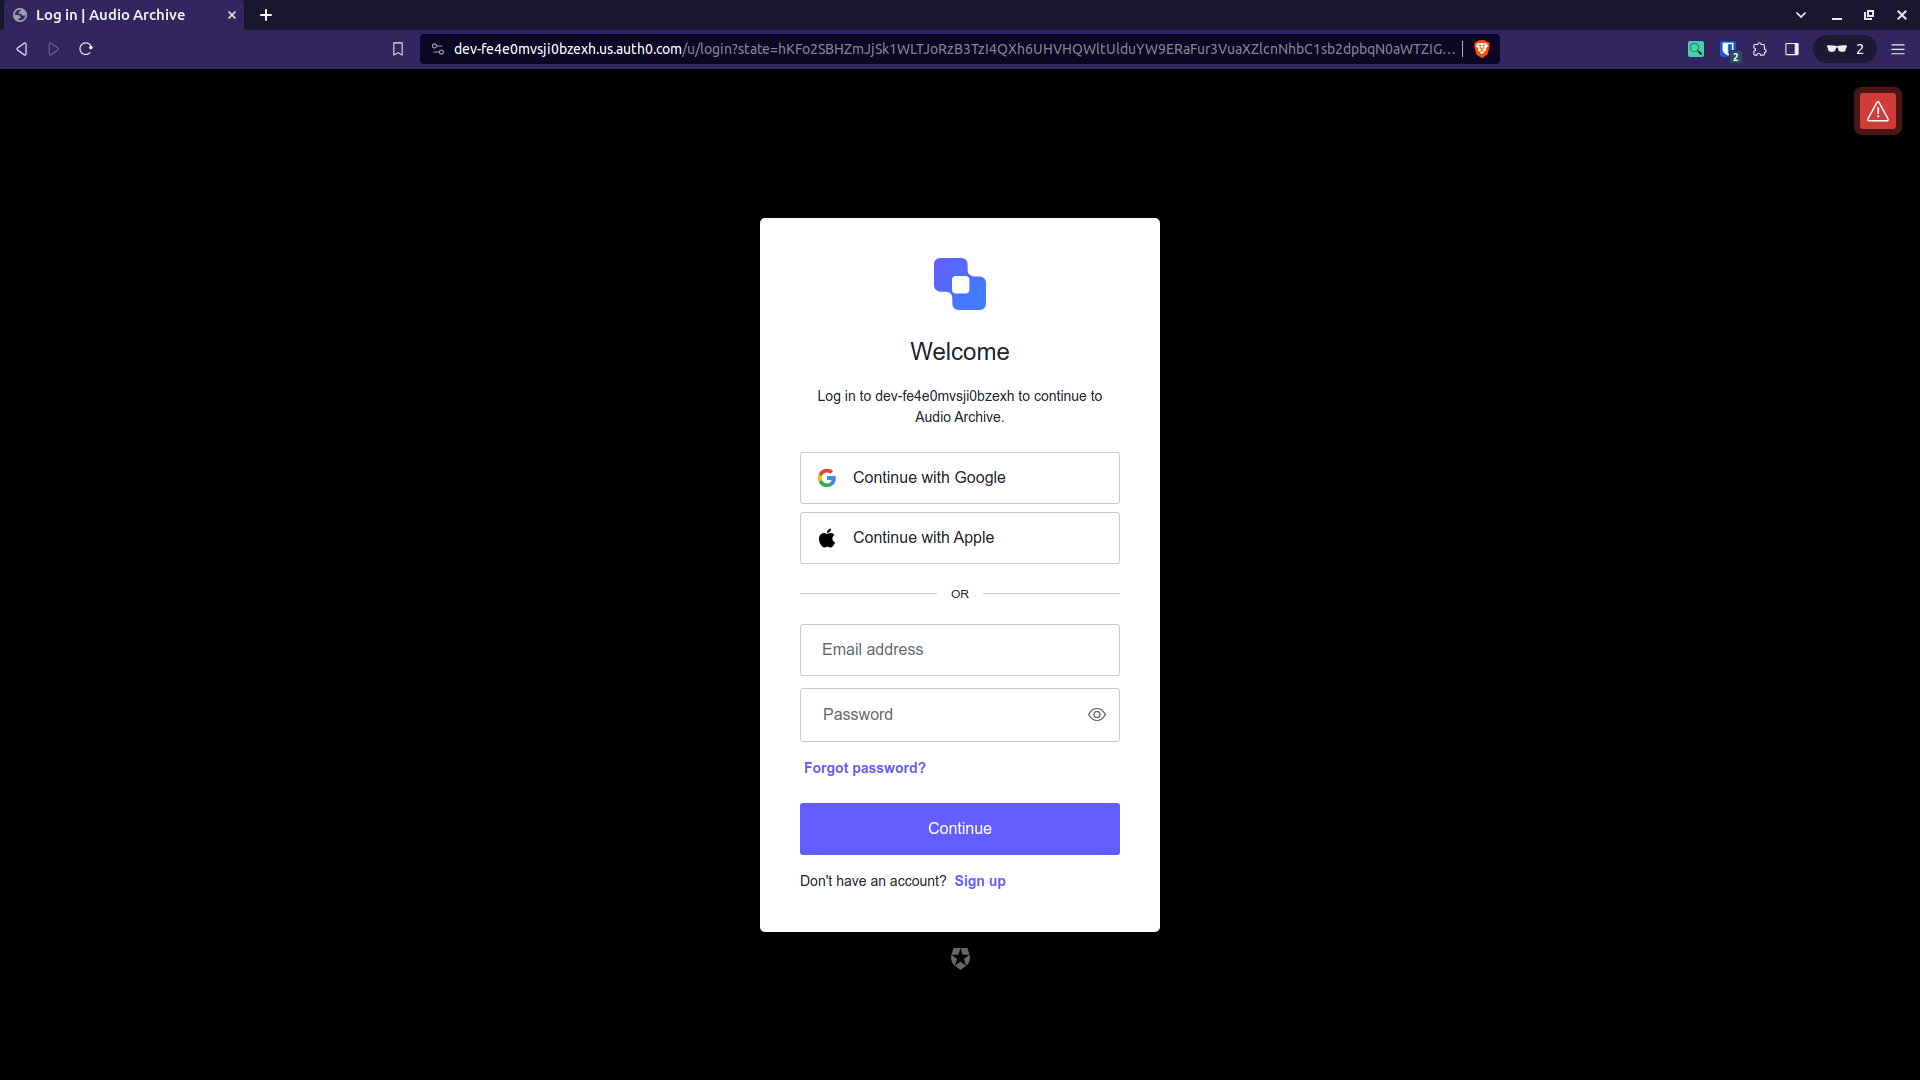
This redirection occurs because we have effectively made all of our routes private. The function withMiddlewareAuthRequired() informs Next.js and Auth0 that authentication is required for all requests processed by said middleware.
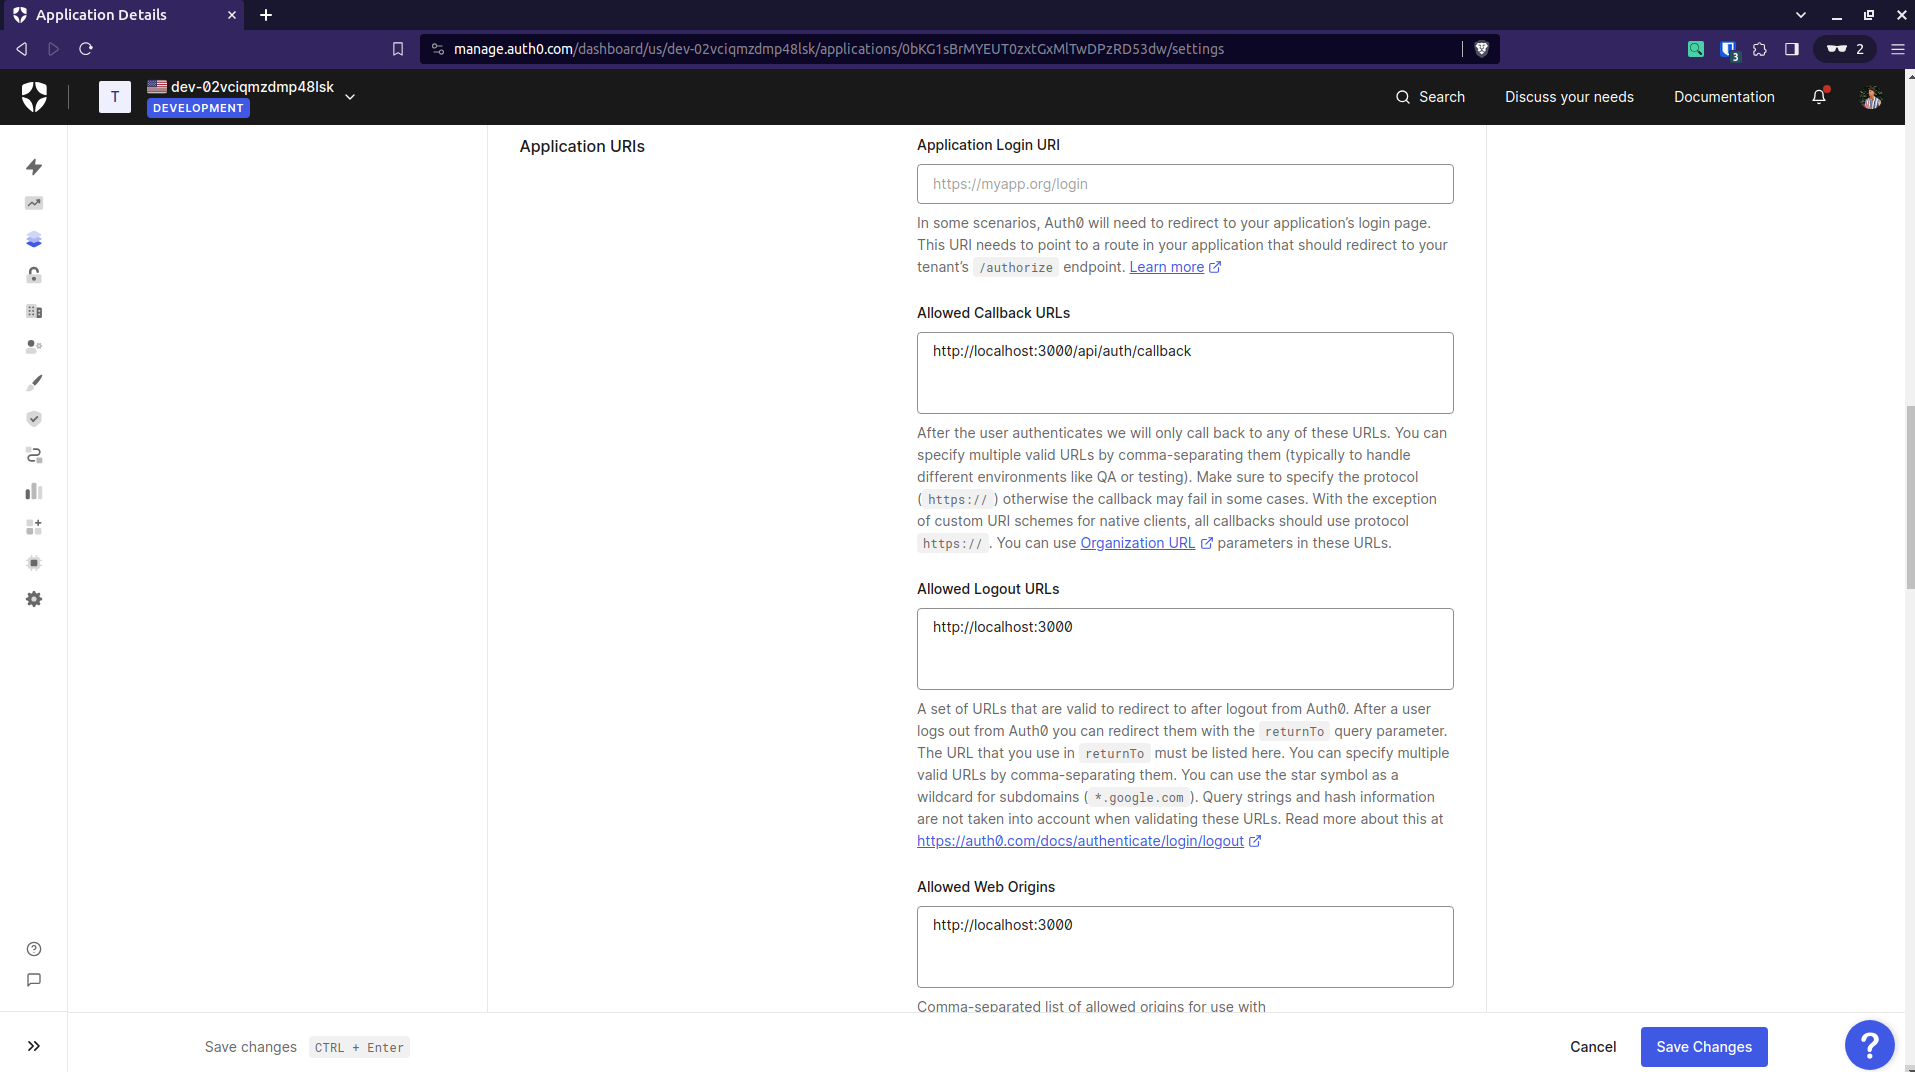
WARNING: If you see the following error instead of a login screen, it means we need to update your Next.js application URI settings in AUTH0.
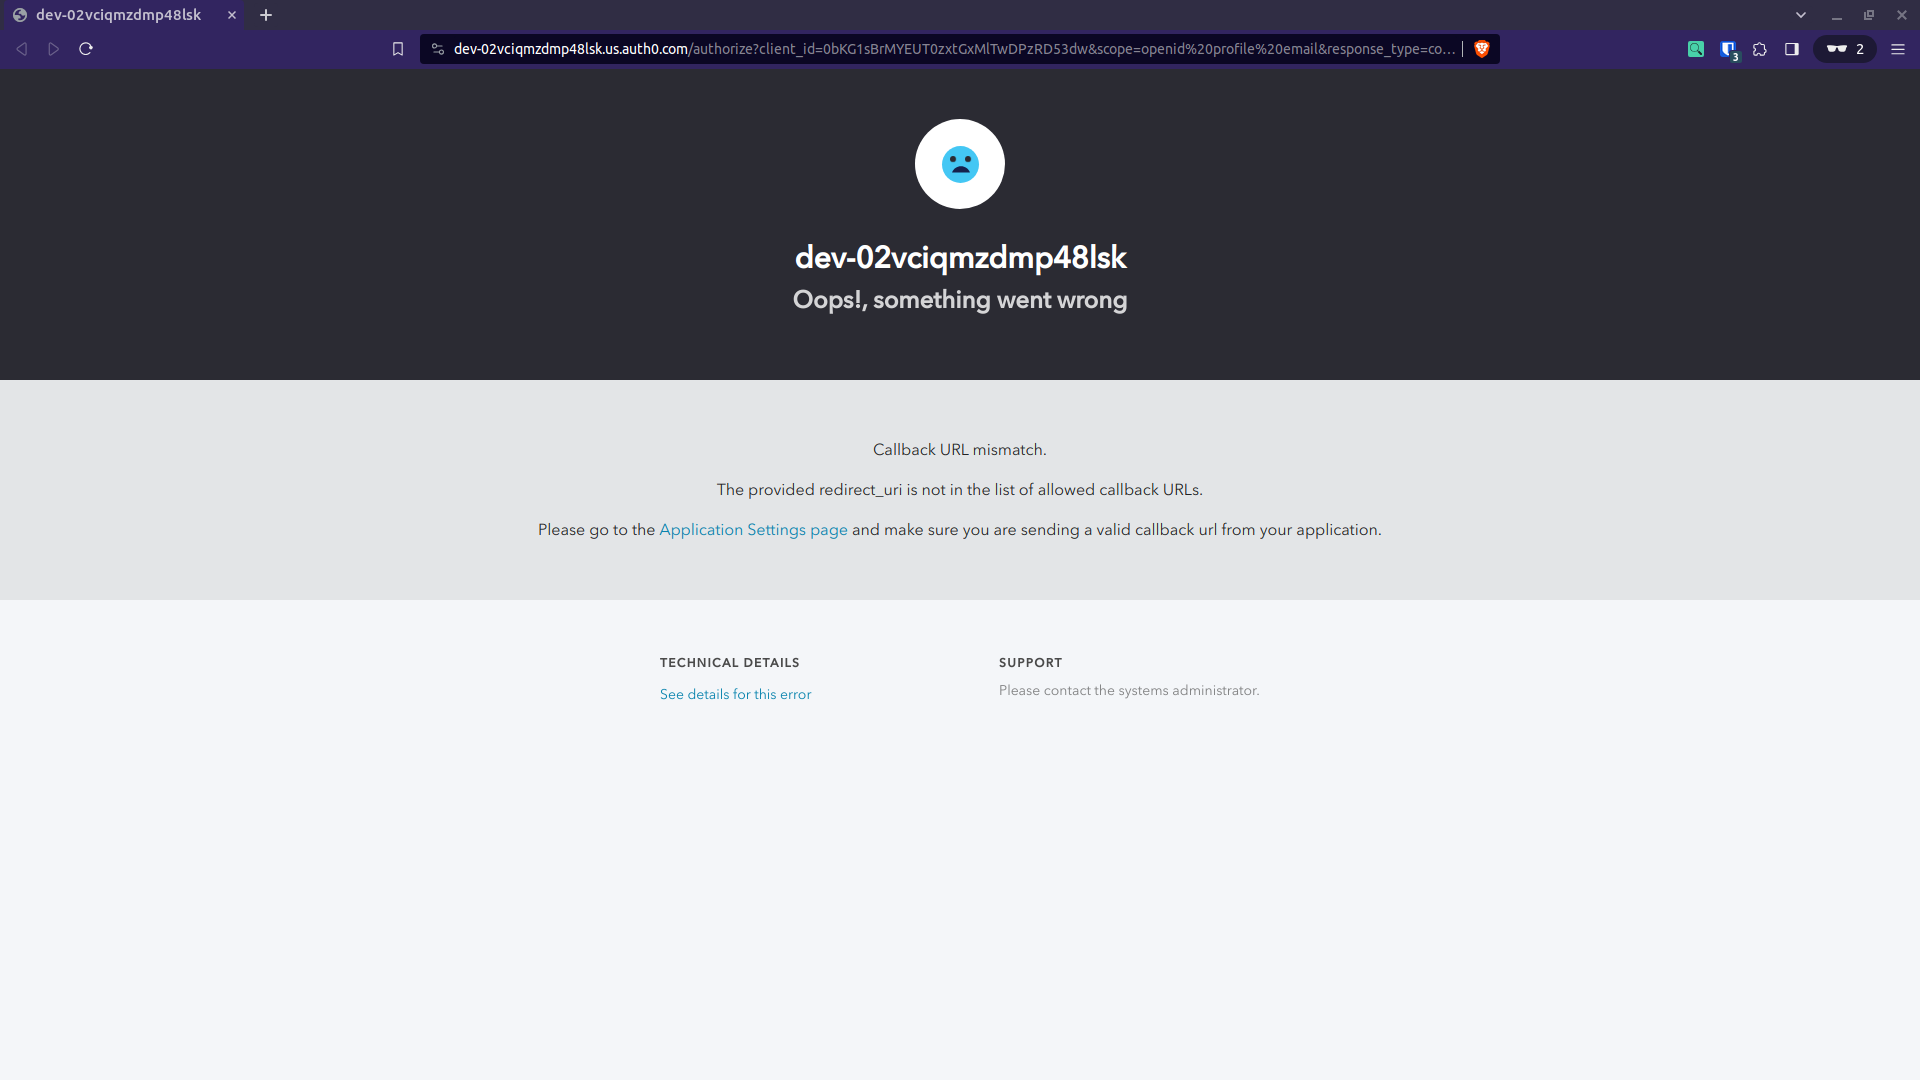
The updated URI settings should be:
- Allowed Callback URLs: http://localhost:3000/api/auth/callback
- Allowed Lgout URLs: http://localhost:3000
- ALlowed Web Origins: http://localhost:3000
Note that if you log in or sign up, you will again have access to all of the pages of our application.
- Define which routes to protect
Now, we don't actually want to make the whole app private, so let's tell our middleware to only run on our /private and /api routes with the following change:
import { withMiddlewareAuthRequired } from '@auth0/nextjs-auth0/edge';

export default withMiddlewareAuthRequired();

export const config = {
   matcher: ['/private/:path*', '/api/:path*'],
};
Ensure you are logged out and navigate back to http://localhost:3000. You should now have access to both our Home and Public pages. Additionally, if you navigate to http://localhost:3000/private, you will once again be redirected to our login screen.
You cannot access the Next.js middleware from server components as Next.js middleware only runs on navigated routes and/or API requests that come from client components.
Protecting Our API Routes
If you return to http://localhost:3000/api, you will notice that now you need to be logged in to see our Server Running... message. This is because we passed our API routes to our middleware matcher with '/api/:path*'.
However, there is still a massive security flaw in our design. If you navigate to http://localhost:5000/api, you will see our Server Running... message, which means that our route isn't actually protected.
This is because nothing is preventing unauthorized users from bypassing our security simply by hitting our backend API routes instead of our frontend UI.
To remedy this, we need to add our Express API to Auth0 and add authentication to the API route in our Express server code.
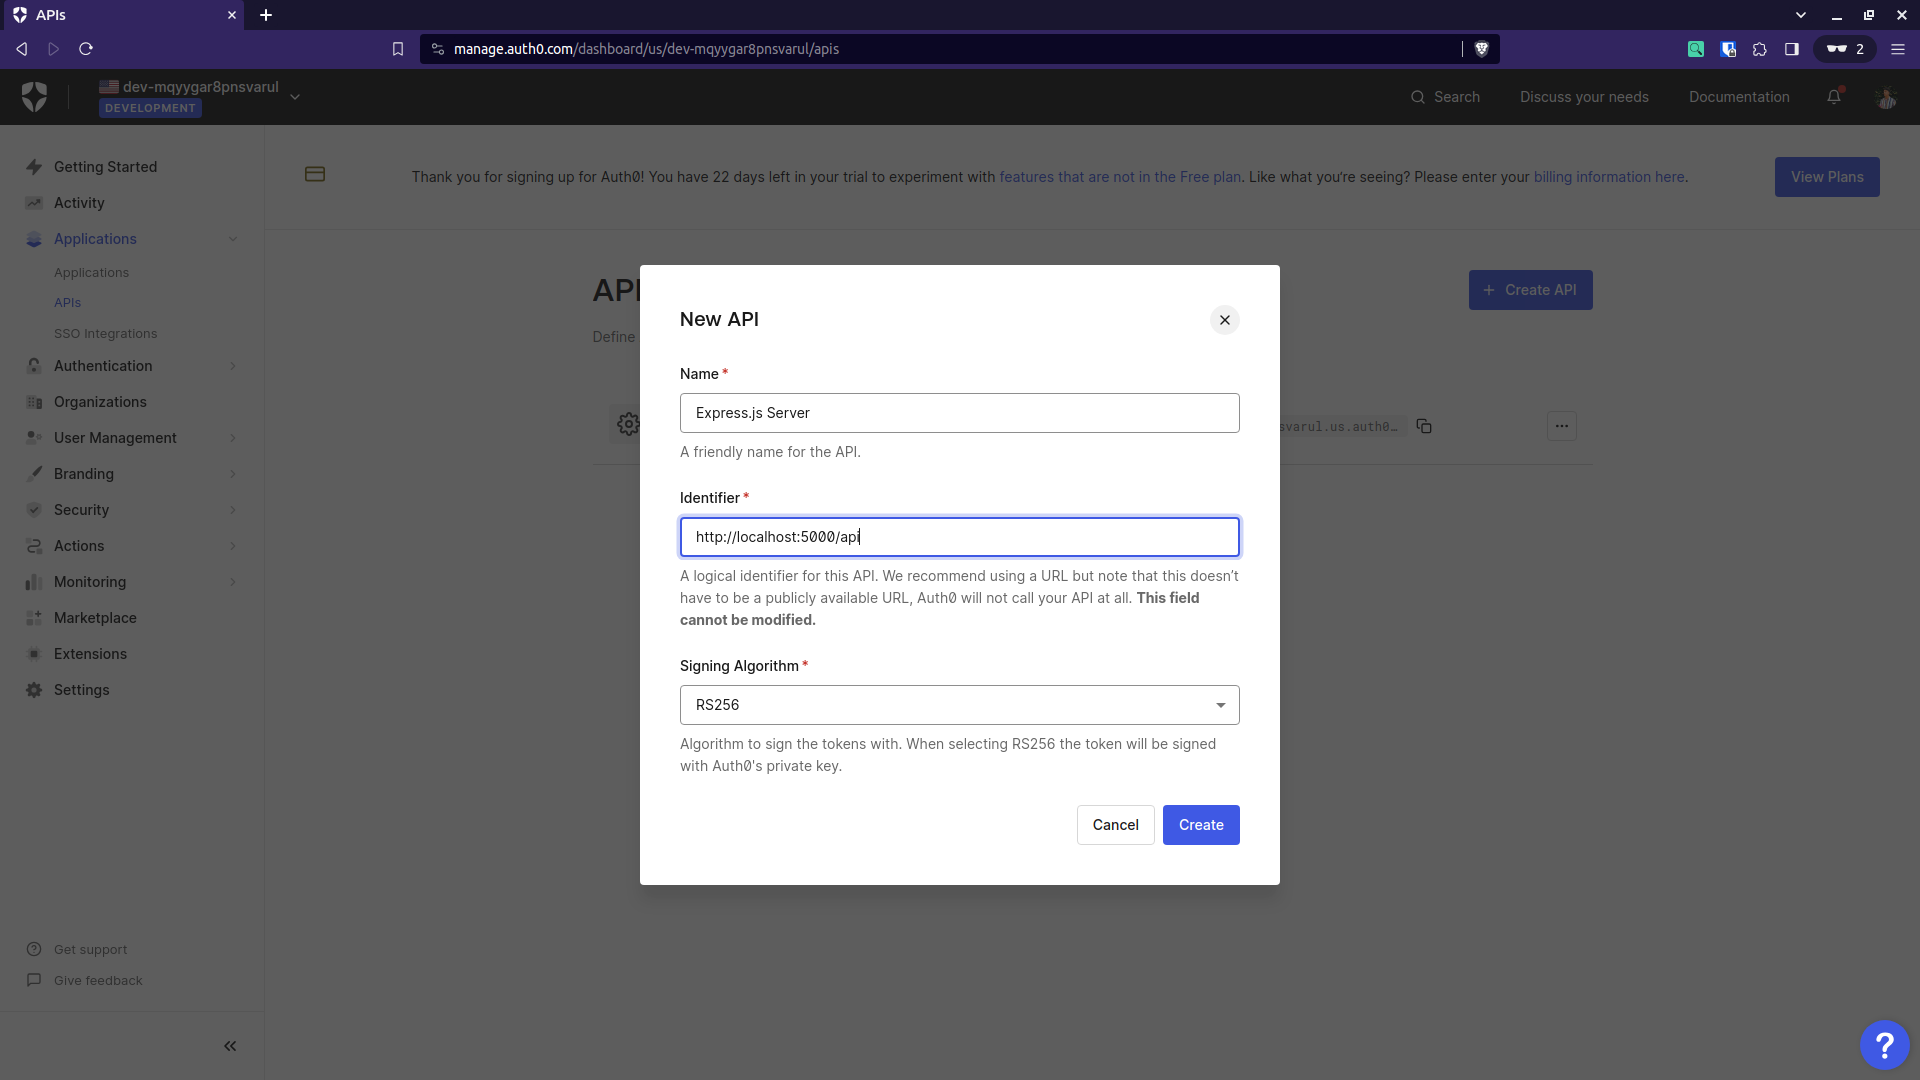
- In your Auth0 dashboard go to
Applications>APIs.
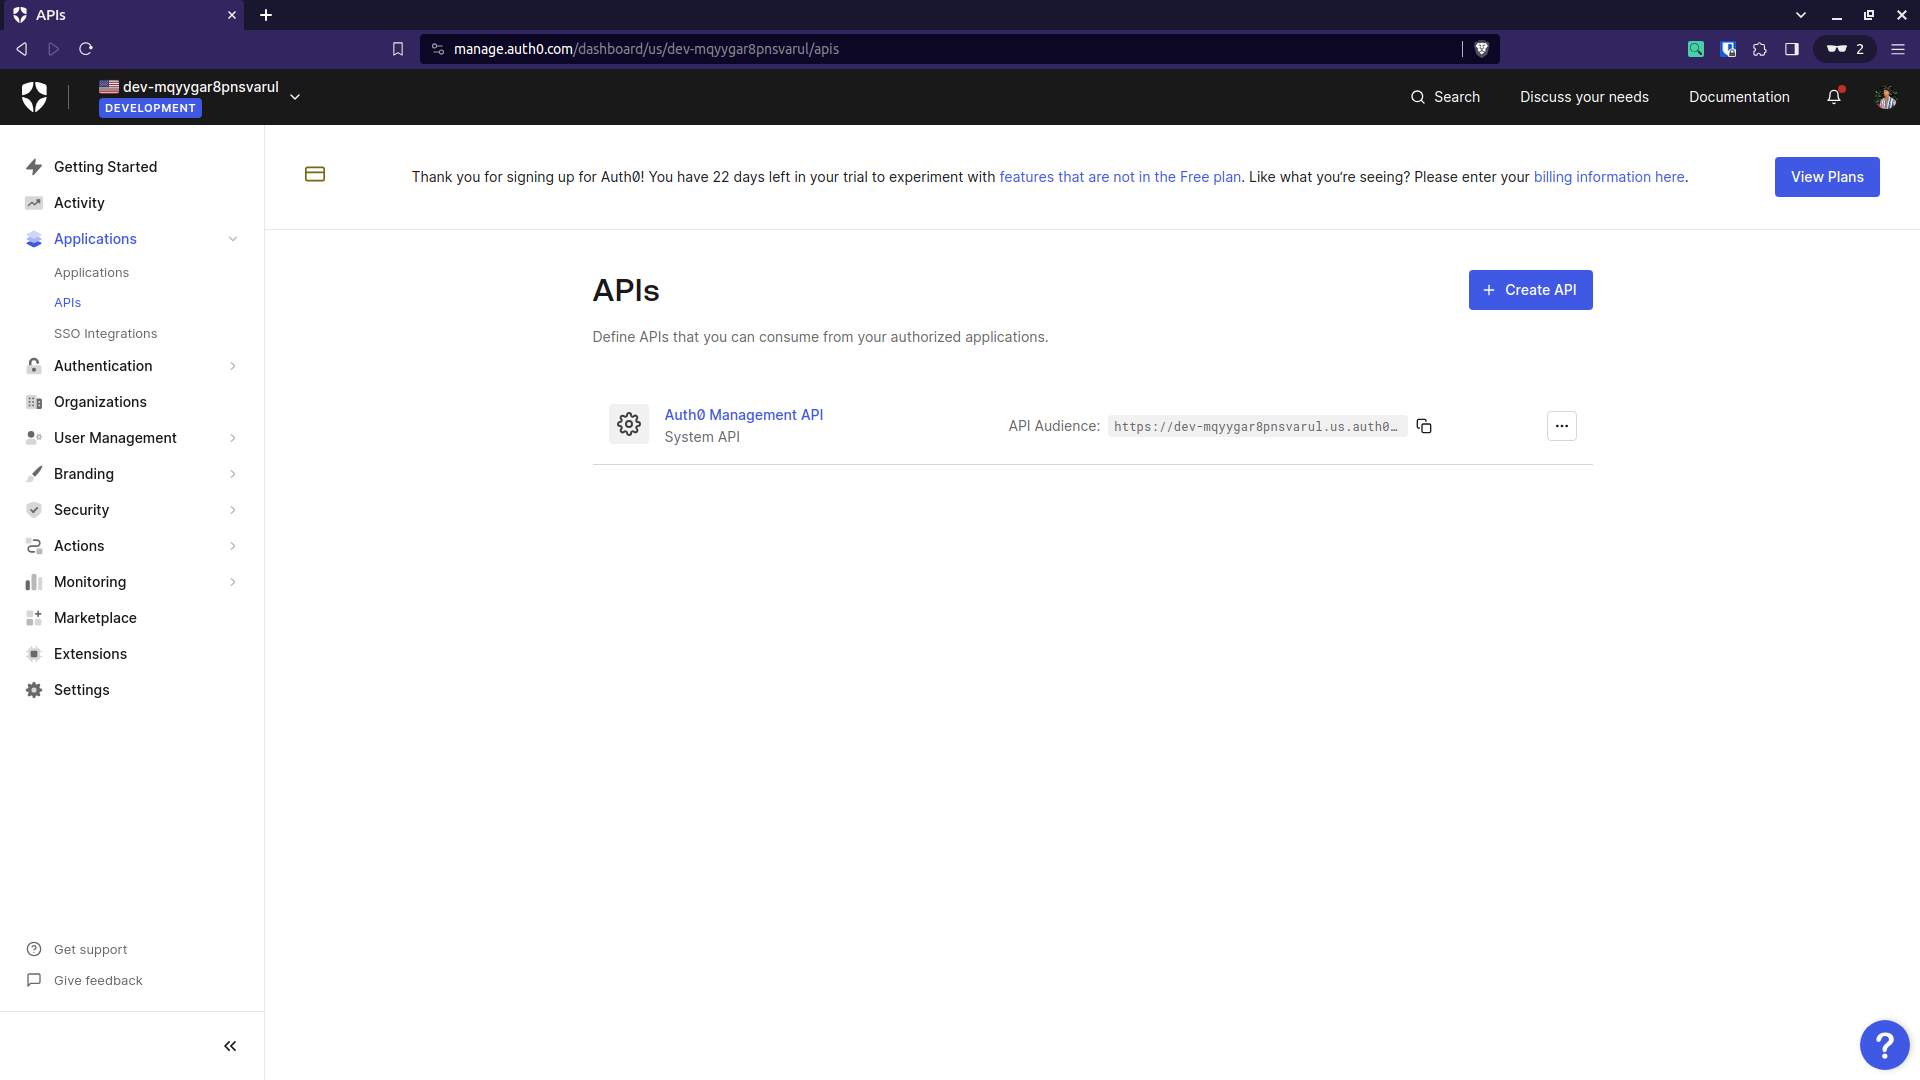
-
Click the
+ Create API buttonand update the form's Name and Identifier fields before clicking create:- Name: Express.js Server
- Identifier: http://localhost:5000/api
- Signing Algorithm: RS256
-
Update your Environment Variables
-
Create a new
AUTH0_AUDIENCEenv variable and set its value equal to the identifer from the previous step. Add this variable in both yourclient/.env.localandserver/.envfiles: -
Copy the
AUTH0_ISSUER_BASE_URLenvironment variable from theclient/.env.localfile and add it to theserver/.envfile.
-
PORT=5000

AUTH0_AUDIENCE=http://localhost:5000/api
AUTH0_ISSUER_BASE_URL='https://dev-mqyygar8pnsvarul.us.auth0.com'# Secret key for Auth0 - To generate, run `openssl rand -hex 32` in the command line
AUTH0_SECRET='e2ebaf05e08f75b2eb3605ce28e6bf3ef0e68c54d9672ec87b4e69fae2f38460'
# The base URL for your application
AUTH0_BASE_URL='http://localhost:3000'
# Your Auth0 tenant domain
AUTH0_ISSUER_BASE_URL='https://dev-mqyygar8pnsvarul.us.auth0.com'
# Your Auth0 client ID
AUTH0_CLIENT_ID='Hdyjm0UaxA4siHztbgIdU5POnJlgfeLm'
# Your Auth0 client secret
AUTH0_CLIENT_SECRET='vZ1tRndqiVqLUD7UYFH2d4XWGQOw4jNjuj7Abd45BmMNlmCyaVNapERUE3r9KpsQ'
# The audience that the Auth0 ID token is intended for
AUTH0_AUDIENCE=http://localhost:5000/apiNow that we've added our API to to our Auth0 dashboard, we can add authentication directly to our server routes.
- In your Express.js server directory, install the following npm packages:
#  ENSURE YOU ARE IN YOUR SERVER DIRECTORY
pnpm i express-jwt jwks-rsa- Create a
server/src/middleware/authMiddleware.tsmiddleware file in your backend.
import 'dotenv/config';

import { GetVerificationKey, expressjwt as jwt } from 'express-jwt';
import jwksRsa from 'jwks-rsa';
const issuerBaseUrl = process.env.AUTH0_ISSUER_BASE_URL;
const audience = process.env.AUTH0_AUDIENCE || 'http://localhost:5000/';

export const checkJwt = jwt({
  secret: jwksRsa.expressJwtSecret({
    cache: true,
    rateLimit: true,
    jwksRequestsPerMinute: 5,
    jwksUri: `${issuerBaseUrl}/.well-known/jwks.json`,
  }) as GetVerificationKey,
  audience: audience,
  issuer: `${issuerBaseUrl}/`,
  algorithms: ['RS256'],
});
Our Express.js server will use this auth middleware to decrypt any JWT Authentication Tokens that it receives from our Next.js frontend.
- In your
server/src/routes/index.tsfile, import the auth middleware and add it to your individual API routes:
import cookieParser from 'cookie-parser';
import express from 'express';
import flash from 'express-flash';
import morgan from 'morgan';
import {
  generalErrorHandler,
  notFoundHandler,
} from './middleware/errorMiddleware';
import routes from './routes/index';
import { checkJwt } from './middleware/authMiddleware';

const app = express();

app.use(morgan('dev'));
app.use(express.json());
app.use(express.urlencoded({ extended: false }));
app.use(cookieParser());
app.use(flash());

app.use('/api', checkJwt, routes);

app.use(notFoundHandler);
app.use(generalErrorHandler);

export default app;
You could apply the auth middleware to individual routes instead with something like this:
import { Router } from 'express';
import asyncHandler from 'express-async-handler';
import { checkJwt } from '../middleware/authMiddleware';
const router = Router();
router.get(
'/',
checkJwt,
asyncHandler(async (req, res, next) => {
res.status(200).send('Server Running...');
})
);
router.get(
'/private-route',
checkJwt,
asyncHandler(async (req, res, next) => {
res.status(200).send({ message: 'This is a private route' });
})
);
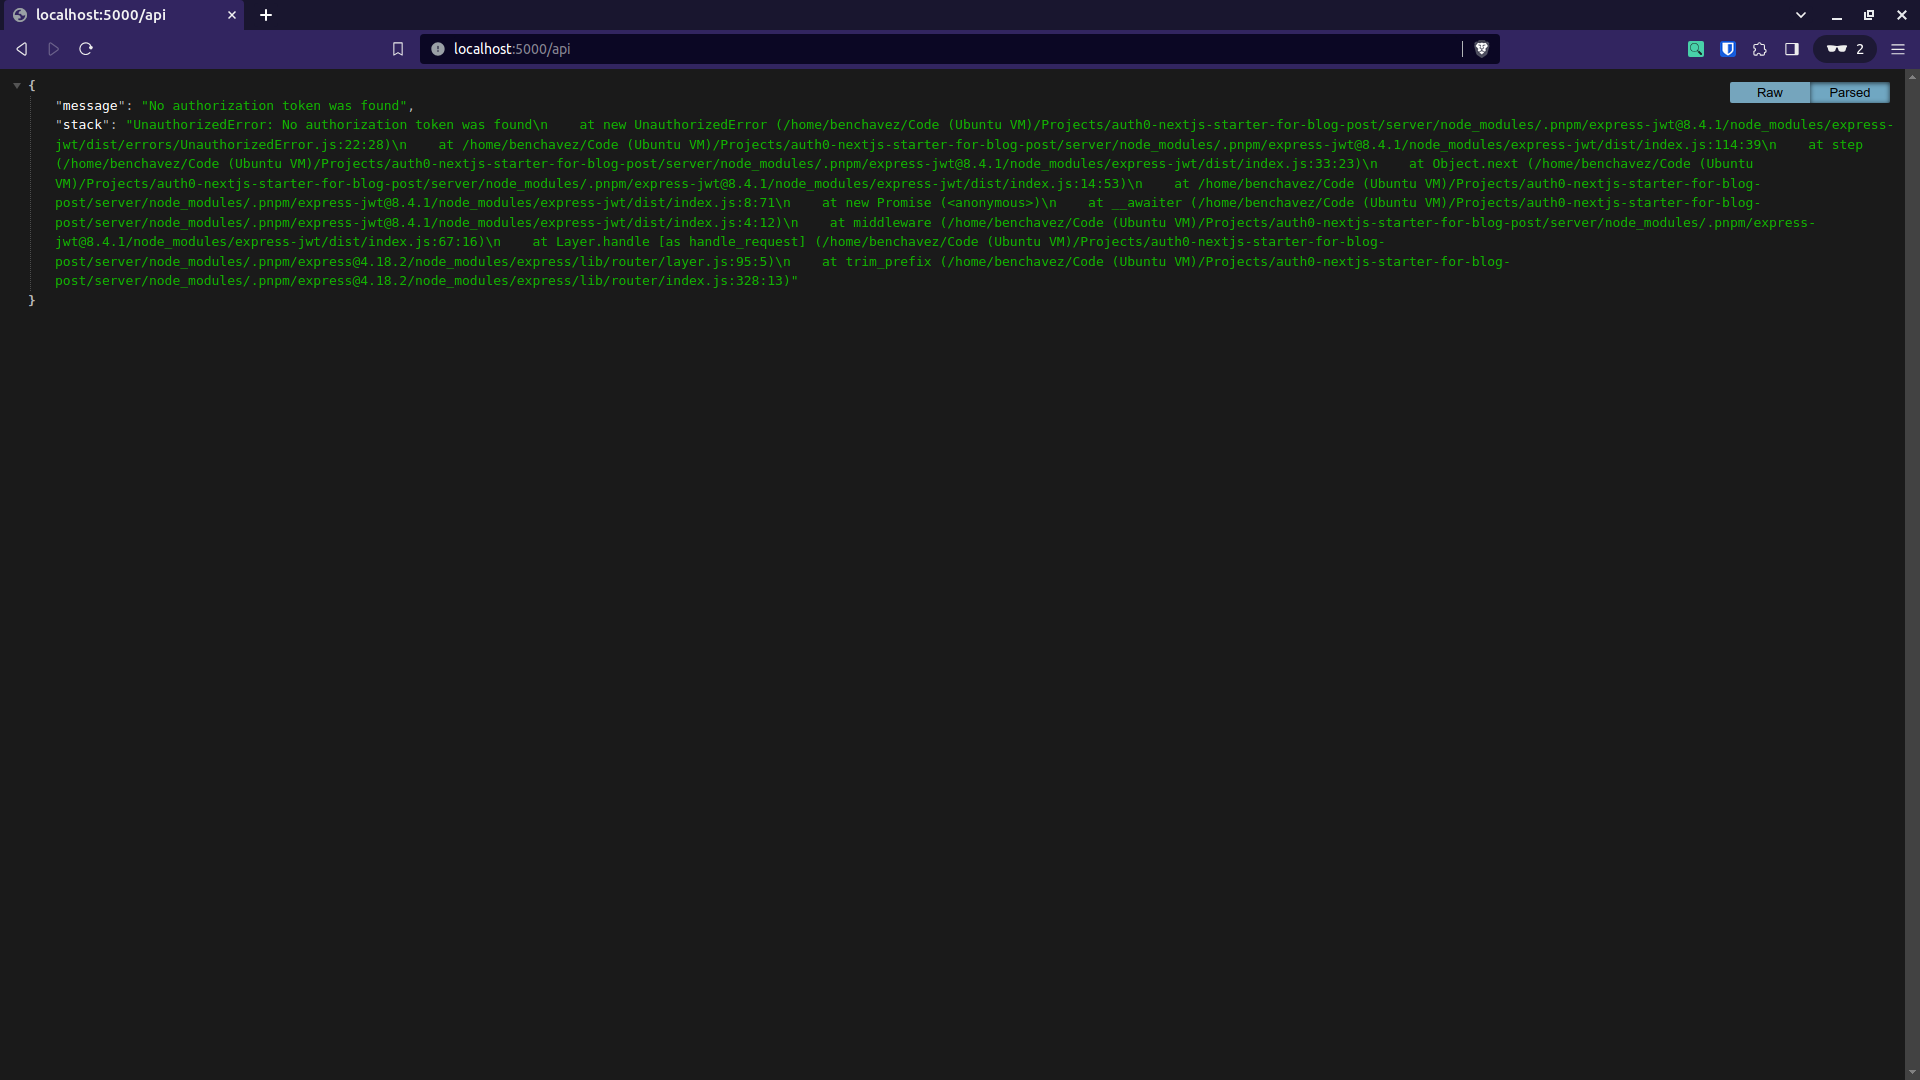
export default router;If we open back up to http://localhost:5000/api, we will see that we have succesfully protected our backend API routes as well:
Add CORS (optional)
For this specific example, adding CORS is not required because we are rewriting our API requests. TODO: essentially sidestepping TODO: a browser-enforced security measure and doesn't apply to server-to-server communication.
However, it is good practice to add CORS so that we can avoid any cross-origin errors that might come up if we were to establish further communication between our frontend and our backend.
- Copy over the
AUTH0_BASE_URLEnvironment variable from your next.js app's.env.localfile and paste it into your Express Server'sserver/.envfile:
PORT=5000

AUTH0_BASE_URL=http://localhost:3000
AUTH0_AUDIENCE=http://localhost:5000/api
AUTH0_ISSUER_BASE_URL='https://dev-q514l5sgo7t68du7.us.auth0.com'- Install the CORS npm package on your server:
pnpm i cors- Update the imports and add
corsas middleware in your server'sapp.tsfile:
import 'dotenv/config';
import cors from 'cors';
import cookieParser from 'cookie-parser';
import express from 'express';
import flash from 'express-flash';
import morgan from 'morgan';
import {
  generalErrorHandler,
  notFoundHandler,
} from './middleware/errorMiddleware';
import routes from './routes/index';
import { checkJwt } from './middleware/authMiddleware';

const app = express();
const baseUrl = process.env.AUTH0_BASE_URL;

app.use(morgan('dev'));
app.use(cors({ origin: baseUrl }));
app.use(express.json());
app.use(express.urlencoded({ extended: false }));
app.use(cookieParser());
app.use(flash());

app.use('/api', checkJwt, routes);

app.use(notFoundHandler);
app.use(generalErrorHandler);

export default app;
Securely passing Auth Tokens
So far, this is great, we have both our frontend and backend protected. The only problem is that now we have to pass auth tokens to our server API to gain access to protected backend API routes.
If we are making requests from a server component, this would be easy! We would simply get the auth token from our session and pass it with the request:
// THIS IS EXAMPLE CODE ONLY AND WILL NOT USED IN OUR APPLICATION
import { getAccessToken } from '@auth0/nextjs-auth0';

export async function getMyProducts() {
  const { accessToken } = await getAccessToken();

  const res = await fetch(`http://localhost:5000/api`, {
    method: 'GET',
    headers: {
      Authorization: `Bearer ${accessToken}`,
    },
  });

  return res.json();
}
However, client components cannot use the getAccessToken() method...
We could get the access token in a server component and pass it as props to our client component. That would work, but it wouldn't be the most secure solution since we would be sending the auth token to the client.
A more secure solution is to add the authToken to our API Request's headers, in our frontend middleware, before rewriting our requests to our backend API.
Up to now, we have manually created each of our requests by entering the url in our browser. So to set this up we will need to program a new request that we can attach our authentication token to.
- Convert the
Privatepage to a client component by adding the'use client'directive to the top of the file.
'use client';- Import React's
useStatehook and write acallApi()function that fetches data from our Express server.
import { useState } from 'react';

export default function PrivatePage() {
  const [state, setState] = useState({
    isLoading: false,
    response: undefined,
    error: undefined,
  });

  const callApi = async () => {
    setState((previous) => ({ ...previous, isLoading: true }));

    try {
      const response = await fetch('/api/private-route');
      const data = await response.json();

      setState((previous) => ({
        ...previous,
        response: data,
        error: undefined,
      }));
    } catch (error) {
      setState((previous) => ({
        ...previous,
        response: undefined,
        error,
      }));
    } finally {
      setState((previous) => ({ ...previous, isLoading: false }));
    }
  };

  const { isLoading, response, error } = state;
  ...
}- Add a button that we can use to initiate API requests
<button
  onClick={callApi}
  className="mt-10 block rounded bg-pink-800/50 px-2 py-1 text-white hover:opacity-70"
>
  Call API
</button>- If we are not in a
loading state, display the server response
if (!isLoading) {
return (
<>
...
<div className="mt-20">
{response && <div>{JSON.stringify(response)}</div>}
</div>
</>
);
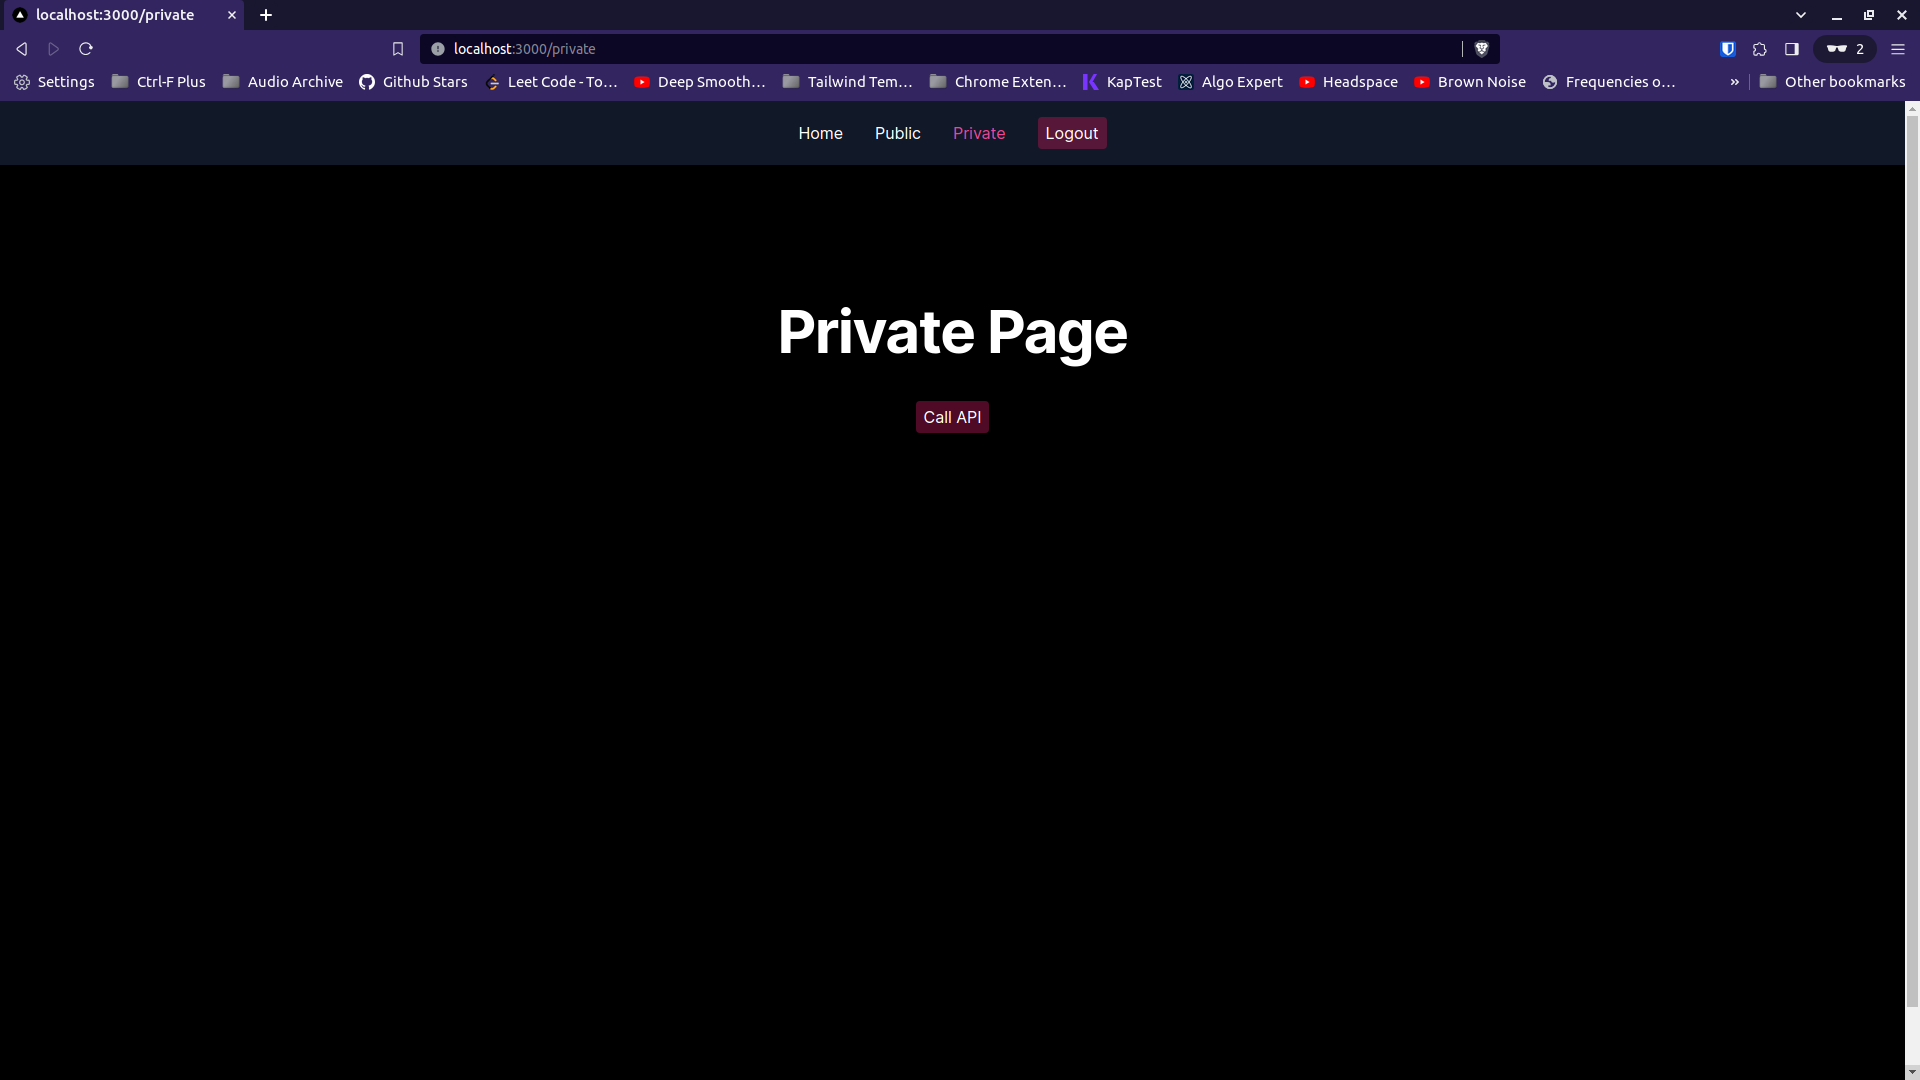
}Your fully updated Private page should look like this:
'use client';

import { useState } from 'react';

export default function PrivatePage() {
  const [state, setState] = useState({
    isLoading: false,
    response: undefined,
    error: undefined,
  });

  const callApi = async () => {
    setState((previous) => ({ ...previous, isLoading: true }));

    try {
      const response = await fetch('/api/private-route');
      const data = await response.json();

      setState((previous) => ({
        ...previous,
        response: data,
        error: undefined,
      }));
    } catch (error) {
      setState((previous) => ({
        ...previous,
        response: undefined,
        error,
      }));
    } finally {
      setState((previous) => ({ ...previous, isLoading: false }));
    }
  };

  const { isLoading, response, error } = state;

  if (!isLoading) {
    return (
      <>
        <h1 className="mt-10 text-4xl font-bold tracking-tight text-white sm:text-6xl">
          Private Page
        </h1>

        <button
          onClick={callApi}
          className="mt-10 block rounded bg-pink-800/50 px-2 py-1 text-white hover:opacity-70"
        >
          Call API
        </button>

        <div className="mt-20">
          {response && <div>{JSON.stringify(response)}</div>}
        </div>
      </>
    );
  }
}
Now back in your browser, if you log into the app and navigate to http://localhost:3000/private, you should see the updated Private page with our new Call API button.
Set Authentication Headers
Finally, we want to add our authentication token to the headers of the private request as it passes through our Next.js middleware on its way to our Server API.
-
Create a custom middleware function and pass it as an argument to the existing
withMiddlewareAuthRequired()function.The new custom middleware function should take in a
NextRequestobject, copy any existing headers over to a newNextResponseobject.
import { NextRequest, NextResponse } from 'next/server';

export default withMiddlewareAuthRequired(function middleware(
  req: NextRequest,
) {
  if (req.nextUrl.pathname.startsWith('/api/auth')) {
    return;
  }

  const requestHeaders = new Headers(req.headers);
  const user = await getSession(
    req,
    NextResponse.next({
      request: {
        headers: requestHeaders,
      },
    }),
  );
  requestHeaders.set('Authorization', `Bearer ${user?.idToken}`);
});
...- Note that we need to import
getSessionfrom Auth0 so that we can access our our user session and auth token:
import { getSession, withMiddlewareAuthRequired } from '@auth0/nextjs-auth0/edge';

...

// Be sure to add the `async` modifier to your function
export default withMiddlewareAuthRequired(async function middleware(
  req: NextRequest
) {
  if (req.nextUrl.pathname.startsWith('/api/auth')) {
    return;
  }

  const requestHeaders = new Headers(req.headers);
  const user = await getSession(
    req,
    NextResponse.next({
      request: {
        headers: requestHeaders,
      },
    }),
  );
  requestHeaders.set('Authorization', `Bearer ${user?.idToken}`);
});
...- Remove the Authorization header from our newly created
NextResponseobject so that it is not exposed:
const token = user?.accessToken;

const response = NextResponse.next({
  request: {
    headers: requestHeaders,
  },
});

return response;
The fully updated middleware will look like this:
import {
getSession,
withMiddlewareAuthRequired,
} from '@auth0/nextjs-auth0/edge';
import { NextRequest, NextResponse } from 'next/server';
export default withMiddlewareAuthRequired(async function middleware(
req: NextRequest,
) {
if (req.nextUrl.pathname.startsWith('/api/auth')) {
return;
}
const requestHeaders = new Headers(req.headers);
const user = await getSession(
req,
NextResponse.next({
request: {
headers: requestHeaders,
},
}),
);
requestHeaders.set('Authorization', `Bearer ${user?.idToken}`);
const response = NextResponse.next({
request: {
headers: requestHeaders,
},
});
return response;
});
export const config = {
matcher: ['/private/:path*', '/api/:path*'],
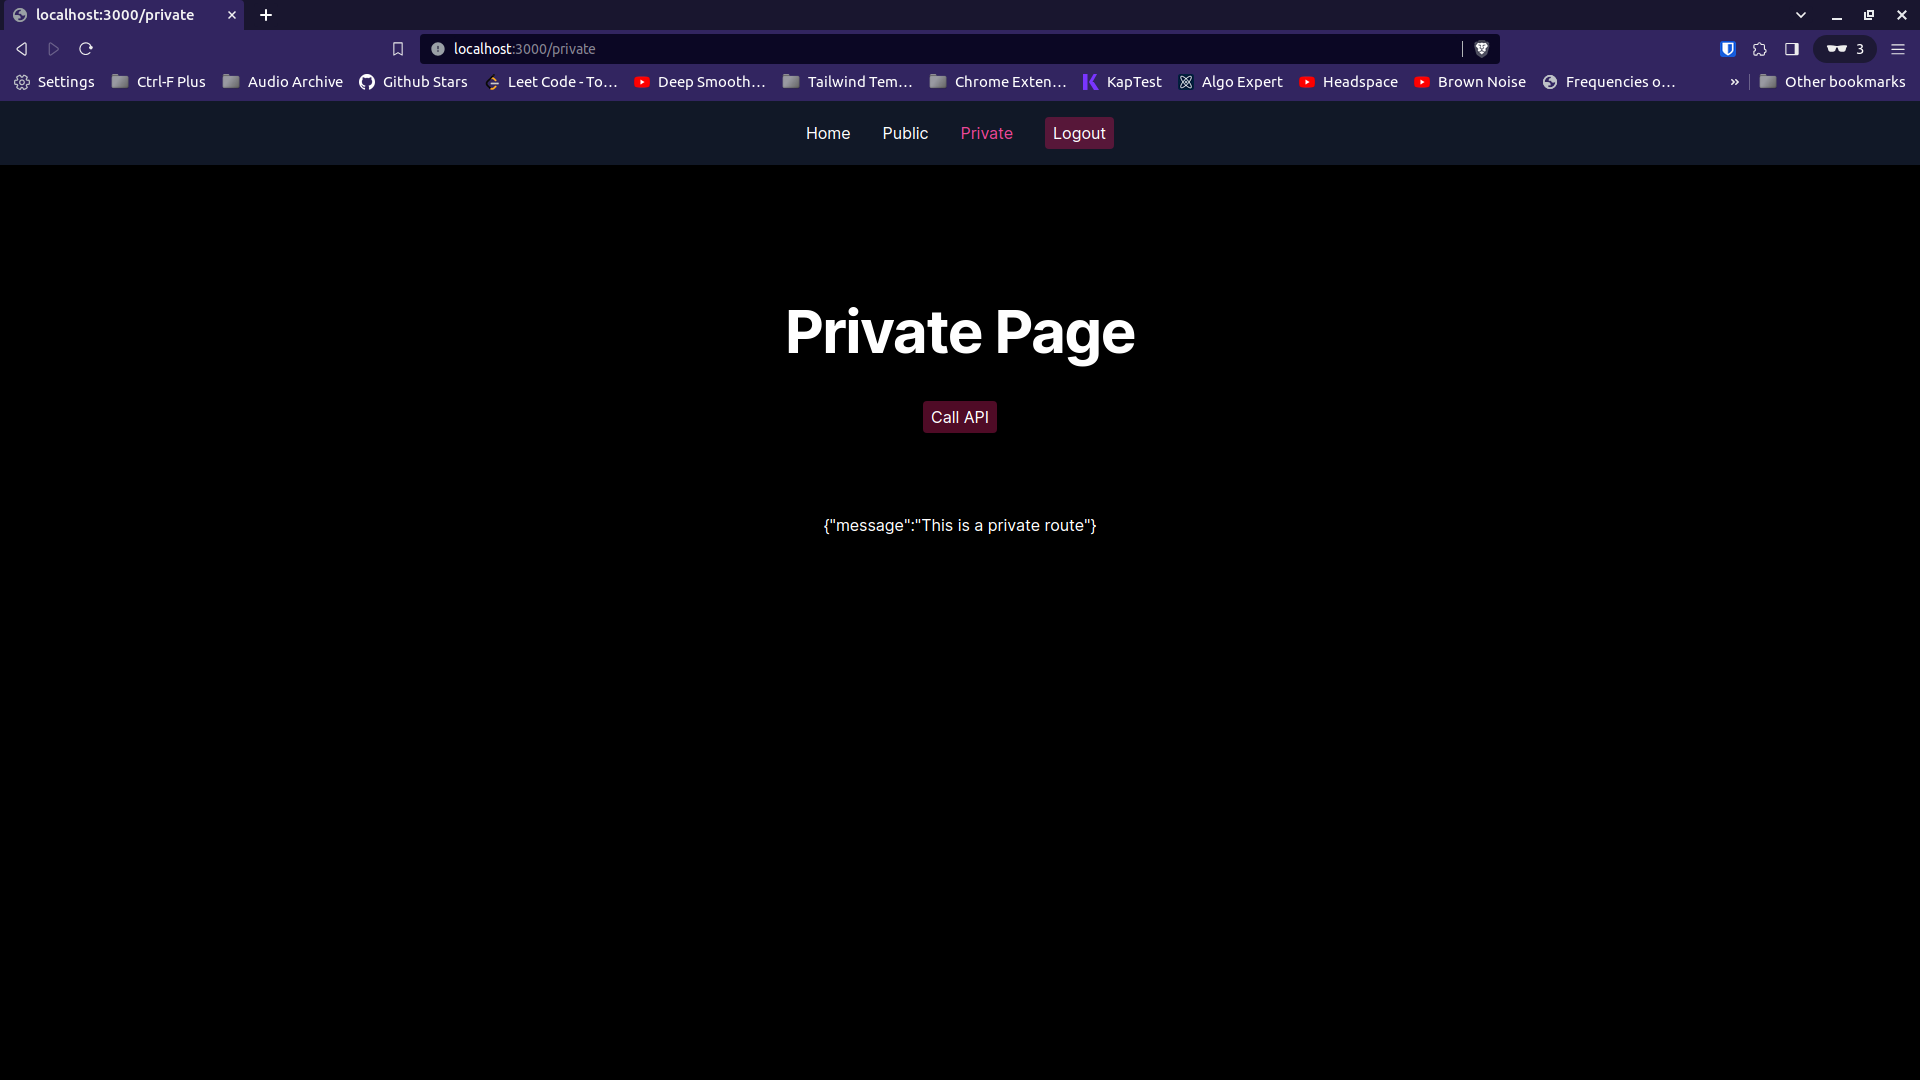
};Now, if we navigate back to http://localhost:3000/private and click our Call API button, we will see the response data object proudly displayed on our Private page, which means we can securely access our protected Server API:
In this article, we learned how to integrate a Next.js frontend with a custom backend Express.js server API using Auth0 for authentication. We covered topics such as setting up a custom backend server, configuring Auth0 for authentication, and integrating the backend with the frontend using rewrites and middleware. By following the steps outlined in this tutorial, you should now have a solid understanding of how to integrate Next.js with Express.js using Auth0 for authentication.
The final code for this post is saved as a project template in this GitHub repo. If you found this code helpful, give the repo a star! ⭐
The authentication methods discussed in this post are techniques I learned and applied in the development of my startup, tentatively named Audio Archive. Audio Archive is a multi-seller marketplace built with node.js, where music producers can buy and sell Digital Audio Workstation (DAW) files."
If you enjoyed this post, stay tuned as I will continue documenting what I learn in the development of Audio Archive. Lastly, if you would like to see the WIP of that project you can find the code here: github.com/benjamin-chavez/AudioArchive.